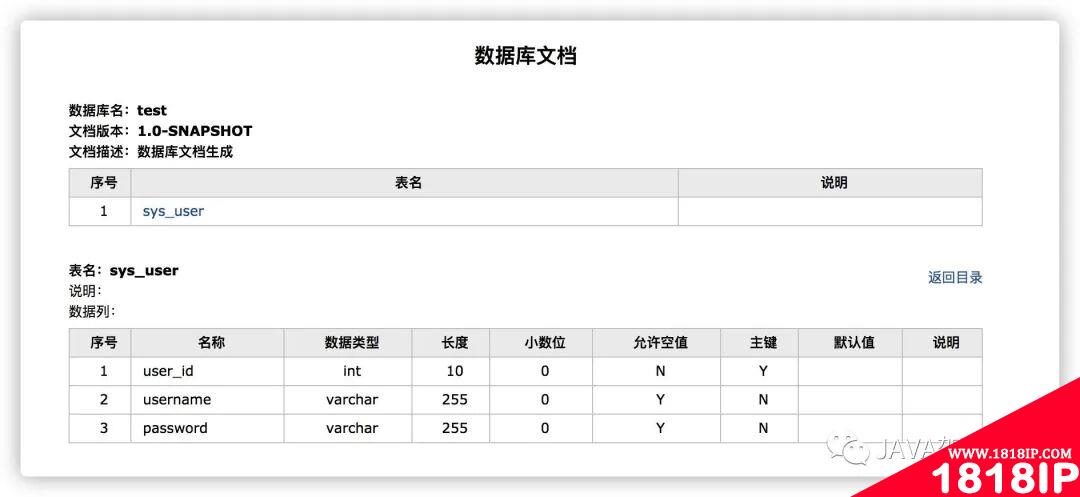
简介

在企业级开发中、我们经常会有编写数据库表结构文档的时间付出,从业以来,待过几家企业,关于数据库表结构文档状态:要么没有、要么有、但都是手写、后期运维开发,需要手动进行维护到文档中,很是繁琐、如果忘记一次维护、就会给以后工作造成很多困扰、无形中制造了很多坑留给自己和后人,于是需要一个插件工具screw[1]来维护。
screw 特点
- 简洁、轻量、设计良好。不需要 powerdesigner 这种重量的建模工具
- 多数据库支持 。支持市面常见的数据库类型 MySQL、Oracle、SqlServer
- 多种格式文档。支持 MD、HTML、WORD 格式
- 灵活扩展。支持用户自定义模板和展示样式
支持数据库类型
- [✔️] MySQL
- [✔️] MariaDB
- [✔️] TIDB
- [✔️] Oracle
- [✔️] SqlServer
- [✔️] PostgreSQL
- [✔️] Cache DB
依赖
这里以 mysql8 数据库为例子
<!--数据库文档核心依赖-->
<dependency>
<groupId>cn.smallbun.screw</groupId>
<artifactId>screw-core</artifactId>
<version>1.0.2</version>
</dependency>
<!--HikariCP-->
<dependency>
<groupId>com.zaxxer</groupId>
<artifactId>HikariCP</artifactId>
<version>3.4.5</version>
</dependency>
<!--mysqldriver-->
<dependency>
<groupId>mysql</groupId>
<artifactId>mysql-connector-java</artifactId>
<version>8.0.20</version>
</dependency>
1. 通过自定义代码配置文档生成
@Test
publicvoidshouldAnswerWithTrue(){
//数据源
HikariConfighikariConfig=newHikariConfig();
hikariConfig.setDriverClassName("com.mysql.cj.jdbc.Driver");
hikariConfig.setJdbcUrl("jdbc:mysql://127.0.0.1:3306/test");
hikariConfig.setUsername("root");
hikariConfig.setPassword("root");
//设置可以获取tablesremarks信息
hikariConfig.addDataSourceProperty("useInformationSchema","true");
hikariConfig.setMinimumIdle(2);
hikariConfig.setMaximumPoolSize(5);
DataSourcedataSource=newHikariDataSource(hikariConfig);
//生成配置
EngineConfigengineConfig=EngineConfig.builder()
//生成文件路径
.fileOutputDir("/Users/lengleng")
//打开目录
.openOutputDir(true)
//文件类型
.fileType(EngineFileType.HTML)
//生成模板实现
.produceType(EngineTemplateType.freemarker).build();

//忽略表
ArrayList<String>ignoreTableName=newArrayList<>();
ignoreTableName.add("test_user");
ignoreTableName.add("test_group");
//忽略表前缀
ArrayList<String>ignorePrefix=newArrayList<>();
ignorePrefix.add("test_");
//忽略表后缀
ArrayList<String>ignoreSuffix=newArrayList<>();
ignoreSuffix.add("_test");
ProcessConfigprocessConfig=ProcessConfig.builder()
//忽略表名
.ignoreTableName(ignoreTableName)
//忽略表前缀
.ignoreTablePrefix(ignorePrefix)
//忽略表后缀
.ignoreTableSuffix(ignoreSuffix).build();
//配置
Configurationconfig=Configuration.builder()
//版本
.version("1.0.0")
//描述
.description("数据库设计文档生成")
//数据源
.dataSource(dataSource)
//生成配置
.engineConfig(engineConfig)
//生成配置
.produceConfig(processConfig).build();
//执行生成
newDocumentationExecute(config).execute();
}
2. 通过插件的形式生成文档
<build>
<plugins>
<plugin>
<groupId>cn.smallbun.screw</groupId>
<artifactId>screw-maven-plugin</artifactId>
<version>1.0.2</version>
<dependencies>
<!--HikariCP-->
<dependency>
<groupId>com.zaxxer</groupId>
<artifactId>HikariCP</artifactId>
<version>3.4.5</version>
</dependency>
<!--mysqldriver-->
<dependency>
<groupId>mysql</groupId>
<artifactId>mysql-connector-java</artifactId>
<version>8.0.20</version>
</dependency>
</dependencies>
<configuration>
<!--username-->
<username>root</username>
<!--password-->
<password>root</password>
<!--driver-->
<driverClassName>com.mysql.cj.jdbc.Driver</driverClassName>
<!--jdbcurl-->
<jdbcUrl>jdbc:mysql://127.0.0.1:3306/test</jdbcUrl>
<!--生成文件类型-->
<fileType>HTML</fileType>
<!--文件输出目录-->
<fileOutputDir>/Users/lengleng</fileOutputDir>
<!--打开文件输出目录-->
<openOutputDir>false</openOutputDir>
<!--生成模板-->
<produceType>freemarker</produceType>
<!--描述-->
<description>数据库文档生成</description>
<!--版本-->
<version>${project.version}</version>
<!--标题-->
<title>数据库文档</title>
</configuration>
<executions>
<execution>
<phase>compile</phase>
<goals>
<goal>run</goal>
</goals>
</execution>
</executions>
</plugin>
</plugins>
</build>
相关文章
标签:数据库运维


