Autoconf/Automake工具用于自动创建功能完善的makefile文件。当前大多数软件包都是用这一工具生成makefile文件的。本节首先介绍Autoconf/Automake工具的功能以及makefile创建过程中所涉及的文件和命令。最后以一个实例介绍如何使用Autoconf/Automake工具自动创建makefile文件。
2.6.1 autoconf安装automake工具组简介(1)
Autoconf/Automake工具组主要包括autoconf、automake、perl语言环境和m4。其中FC4默认安装的autoconf和automake软件包信息如下:
[root@localhost hello]# rpm -qa |grep autoconf//查看是否安装autoconf autoconf-2.59-5 [root@localhost hello]# rpm -qa |grep automake//查看是否安装automake automake14-1.4p6-12 automake-1.9.5-1 automake17-1.7.9-6 automake15-1.5-13 automake16-1.6.3-5 |
默认安装的perl语言环境如下:
[root@localhost ~]# rpm -qa |grep perl// 查看perl的安装情况,已经安装后才有以下信息 perl-Filter-1.30-7 perl-URI-1.35-2 perl-HTML-Tagset-3.04-1 perl-libwww-perl-5.803-2 perl-XML-Encoding-1.01-27 perl-XML-NamespaceSupport-1.08-7 perl-Crypt-SSLeay-0.51-6 perl-XML-Grove-0.46alpha-27 perl-5.8.6-15 perl-DateManip-5.42a-4 perl-HTML-Parser-3.45-1 perl-Compress-Zlib-1.34-2 perl-XML-Parser-2.34-6 perl-XML-Dumper-0.71-4 perl-libxml-enno-1.02-31 perl-Convert-ASN1-0.19-1 perl-XML-SAX-0.12-7 perl-LDAP-0.33-1 perl-XML-LibXML-1.58-2 perl-XML-Twig-3.17-1 perl-Parse-Yapp-1.05-33 perl-libxml-perl-0.08-1 perl-XML-LibXML-Common-0.13-8 |
autoconf安装默认安装的m4软件包如下:
[root@localhost ~]# rpm -qa |grep m4//查看是否安装m4工具 m4-1.4.3-1 |
如果读者没有获得以上任何一个软件包的完全安装,请直接插入FC4安装盘,使用"system-config-packages"命令更新,在开发工具中选中以上选项即可。
以下命令用来查看本节所使用的Autoconf/Automake命令所在位置:
[root@localhost hello]# whereis aclocal//查看aclocal命令所在位置 aclocal: /usr/bin/aclocal /usr/share/aclocal [root@localhost hello]# whereis autoscan//查看autoscan命令所在位置 autoscan: /usr/bin/autoscan /usr/share/man/man1/autoscan.1.gz [root@localhost hello]# whereis autoconf//查看autoconf命令所在位置 autoconf: /usr/bin/autoconf /usr/share/autoconf /usr/share/man/man1/autoconf.1.gz [root@localhost hello]# whereis autoheader//查看autoheader命令所在位置 autoheader: /usr/bin/autoheader /usr/share/man/man1/autoheader.1.gz [root@localhost hello]# whereis automake//查看automake命令所在位置 automake: /usr/bin/automake /usr/local/automake |
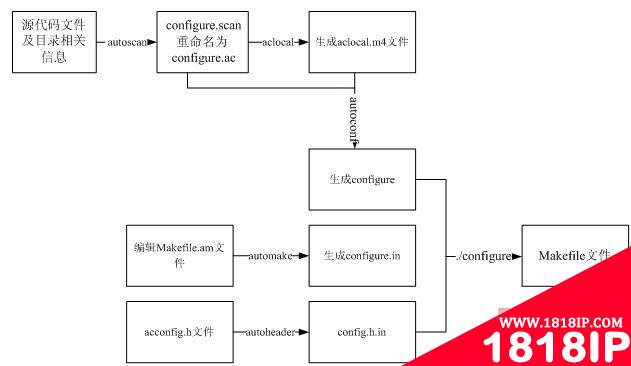
使用Autoconf/Automake工具自动生成Makefile文件的流程图如图2-5所示。在此过程中使用的命令主要有aclocal、autoscan、autoconf、autoheader和automake。由图可知运行步骤如下:
 |
| (点击查看大图)图2-5 自动创建Makefile文件流程 |
(1)创建源代码文件,使用"autoscan"生成configure.scan文件,将其重命名为configure.ac,并做适当修改,然后使用"aclocal"命令生成aclocal.m4文件,使用"autoconf"命令由configure.ac和aclocal.m4文件生成configure文件。
(2)手工编辑Makefile.am文件,使用"automake"命令生成configure.in文件。
(3)手工编辑或由系统给定acconfig.h文件,使用"autoheader"命令生成config.h.in文件。
(4)使用"configure"命令由configuer、configure.in和config.h.in文件生成Makefile文件。从而完成Makefile文件的创建过程。
下面以自动编译hello.c程序为例介绍如何使用这组工具生成makefile文件。
1.使用Vi编辑器编辑源程序
在Linux操作Shell提示符使用Vi编辑器下创建hello.c源程序。
[root@localhost ch0206]# mkdir hello//创建文件夹
[root@localhost ch0206]# cd hello//切换文件
[root@localhost hello]# ls//已经创建的hello.c文件
hello.c
[root@localhost hello]# cat hello.c //C源程序代码
int main(int argc,char** argv)
{
 printf("hello!GNU\n");
 return 0;
}
|
2.使用autoconf安装工具生成configure.ac文件
Autoscan工具用来扫描源代码以搜寻一般的可移植性问题,比如检查编译器、库和头文件等,并创建configure.scan文件,它会在给定目录及其子目录树中检查源文件,若没有给出目录,就在当前目录及其子目录树中进行检查。如下所示:
[root@localhost hello]# autoscan .///在当前文件夹中搜索
autom4te: configure.ac: no such file or directory
autoscan: /usr/bin/autom4te failed with exit status: 1
[root@localhost hello]# ls//生成configure.scan文件,它是configure.ac文件原型
autoscan.log configure.scan hello.c
[root@localhost hello]# cat configure.scan //configure.scan文件内容
# -*- Autoconf -*-
# Process this file with autoconf to produce a configure script.
AC_PREREQ(2.59)//autoconf版本号 AC_INIT(FULL-PACKAGE-NAME, VERSION, BUG-REPORT-ADDRESS)//软件的名称和版本等信息 AC_CONFIG_SRCDIR([hello.c])//侦测源码文件 AC_CONFIG_HEADER([config.h])//用于生成config.h文件 # Checks for programs. AC_PROG_CC//编译器 # Checks for libraries. # Checks for header files. # Checks for typedefs, structures, and compiler characteristics. # Checks for library functions. AC_OUTPUT//输入文件名 |


