切割工具:cut -c/b/d/f file split -b/d/l/C file awk …… —- 小 Q
———————————————————————————————–
|
1
2
3
4
5
6
7
|
1、安装更加容易2、内核升到了3.103、已经没有32位系统,需下载最新版镜像4、启动模式、单用户模式、救援模式改变5、主机名和网络设置的改变6、系统服务的改变7、防火墙的改变 |
1:安装更加容易
相信用过centos7的朋友们,安装的时候明显感觉步骤更少了,安装更简易了;
2:内核升到了3.10
这是一次大版本升级,2–3的跨越,所以改动会很大;相对于以前centos5–centos6的小版本跨越对大家的影响会很大。但是大家必须的学习这种新模式,因为趋势所在;
3、已经没有32位系统,需下载最新镜像
大家在下载时也应该都发现的,一些开源网站都只有x64的ISO;
4、启动模式、单用户模式、救援模式改变
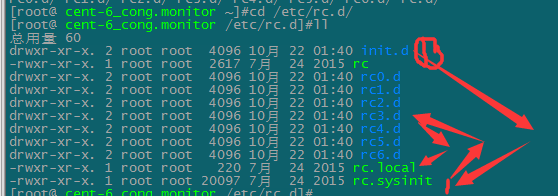
centos6之前启动模式有6个级别:初始化进程会先加载下面内容

centos7变成了4个target:由/etc/ststemd/system.conf 指定开机启动的target
rescue.target 单人模式,对应之前的1级别
graphical.target 多人模式,支持图形和命令行登录,对应之前的3,5级别
multi-user.target 多人模式,只支持命令行登录,对应之前的3级别
emergency.target 单人模式,不过系统进入后根目录是只读的

单用户模式:http://beibing.blog.51cto.com/10693373/1694157
centos6进入单用户模式,启动时任意键 –> e –> e –> 末尾加1/s/sigle –> B –> 改密码;
centos7采用的是grub2,和之前有所不同;
启动时在对应条目上(即第一个)。按e 进入edit模式,搜寻含有ro的一行(以Linux16开头)—>按end键到最后,输入rd.break —>按ctrl+x进入
–>mount -o remount,rw /sysroot/ //重新挂载sysroot,增加写权限
–>chroot /sysroot/ //切换到原始系统
–>touch /.autorelabel //使seliunx生效
–>ctrl+d退出,reboot
注:有时进入系统会乱码,我们可以更改这行的语言指定为英文en_US.UTF-8/zh_CN.UTF-8
救援模式:http://beibing.blog.51cto.com/10693373/1694157
设置光驱启动–>选Troubleshooting–>选Rescure a centos system–>
选continue–>chroot /mnt/sysimage
5、主机名和网络设置的改变
网卡不再是eth0-1
最小化启动时要先自己获取IP:dhclient 即可
没有了ifconfig命令,但可以安装此工具,yum install -y net-tools
但还是建议使用它自带的ip命令,我现在就习惯用它ip a 命令了
配置文件的内容和centos6大同小异,没有什么大的改变;
查看主机名:hostname
设置主机名:hostnamectl set-hostname test1
查看其状态:hostnamectl status
查看其文件:cat /etc/hostname
注:命令参数自动补齐包,yum install -y bash-completion –> source /etc/profile
6、系统服务的改变
centos7不再使用chkconfig工具,而是使用了systemd,其特点如下:
a. 支持服务并行启动,缩短了开机时间;
b. 支持自动检测服务依赖的服务;
systemd
设开机自启:systemctl enable httpd.service
不开机自启:systemctl disable httpd.service
检查是否开机自启:systemctl is-enable httpd
启动脚本路径:/usr/lib/systemd/system/
看服务状态:systemctl status httpd.service
看所有服务:systemctl list-units –type=service
启动服务:systemctl start httpd.service
关闭服务:systemctl stop httpd.service
重启服务:systemctl restart httpd.service
unit
systemd管理所有系统资源,不同资源为unit(单位),unit共分成12中类型:
|
1
2
3
4
5
6
7
8
9
10
11
12
|
Service unit:系统服务 Target unit:多个 Unit 构成的一个组Device Unit:硬件设备 Mount Unit:文件系统的挂载点Automount Unit:自动挂载点 Path Unit:文件或路径Scope Unit:不是由 Systemd 启动的外部进程Slice Unit:进程组 Snapshot Unit:Systemd 快照,可以切回某个快照Socket Unit:进程间通信的 socket Swap Unit:swap 文件Timer Unit:定时器 |
看正在运行的unit:systemctl list-units (包括加载失败的)
看系统所有的unit:systemctl list-units –all
看运行失败的unit:systemctl list-units –failed
看没有运行的unit:systemctl list-units -all –state=inactive
看某unit是否运行:systemctl is-active https.service
看某unit是否失败:systemctl is-failed httpd.service
看某unit是否自启:systemctl is-enabled httpd.service (即开机自启链接)
看类型是service的运行unit:systemctl list-units –type=service
target
target类似于centos6中的启动级别,但target支持同时启动多个target;而target其实就是多个unit的组合,其实启动一个target就是说启动了一套unit。
看所有target:systemctl list-unit-files –type=target (–state=xxx)
看默认target:systemctl get-default
设默认target:systemctl set-default multi-user.target
看target包含的unit:systemctl list-dependencies
切换target,默认不关闭前一个target启动的进程,但可以使用isolate改变这种行为
systemctl isolate multi-user.target
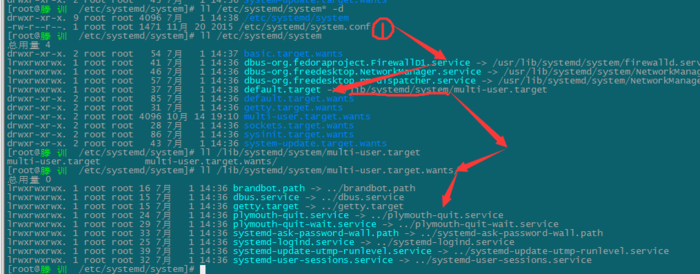
注解:就像上图,主配置文件/etc/systemd/system.conf定义启动target;
开机加载/etc/systemd/system/default.target
软链到/usr/lib/systemd/system/xxxx,包含了target内要启动的server和target;
然后加载/usr/lib/systemd/system/xxxx.wants下的service;
service属于哪个target在/usr/lib/systemd/system/xxx.service内定义。
7、防火墙的改变
centos7改变了以往使用的iptables,而使用了firewalld:同–底层都是用的iptables工具
iptables:静态防火墙,更改后重新加载(即先清空规则再加载),存于/etc/sysconfig/iptables;
firewald:动态防火墙,更改实时生效,不需加载;
(若仍想使用iptables,可停掉firewall,下载iptables-services包)
关闭服务:systemctl stop firewalld
关闭自启:systemctl disable firewalld
yum install -y iptables-services
设置自启:systemctl enable iptables
开启服务:systemctl start iptables
firewalld加入了新概念:zone 和 service
默认有9个zone,每个zone内保存的规则不一,centos7默认使用的是public
默认定义了70+个service,存在于/usr/lib/firewalld/services
手动更改配置文件,要重加载:firewall-cmd –reload (不会中断用户连接)
彻底加载:firewall-cmd –complete-reload (会中断所有连接)
|
1
2
3
4
5
6
7
8
9
|
drop(丢弃) 任何接收的网络数据包都被丢弃,没有任何回复。仅能有发送出去的网络连接。block(限制)任何接收的网络连接都被 IPv4 的 icmp-host-prohibited 信息和 IPv6 的 icmp6-adm-prohibited 信息所拒绝。public(公共)在公共区域内使用,不能相信网络内的其他计算机不会对您的计算机造成危害,只能接收经过选取的连接。external(外部)特别是为路由器启用了伪装功能的外部网。您不能信任来自网络的其他计算,不能相信它们不会对您的计算机造成危害,只能接收经过选择的连接。dmz(非军事区)用于您的非军事区内的电脑,此区域内可公开访问,可以有限地进入您的内部网络,仅仅接收经过选择的连接。work(工作)用于工作区。您可以基本相信网络内的其他电脑不会危害您的电脑。仅仅接收经过选择的连接。home(家庭)用于家庭网络。您可以基本信任网络内的其他计算机不会危害您的计算机。仅仅接收经过选择的连接。internal(内部) 用于内部网络。您可以基本上信任网络内的其他计算机不会威胁您的计算机。仅仅接受经过选择的连接。trusted(信任)可接受所有的网络连接。 |
指定其中一个区域为默认区域是可行的。
当接口连接加入了 NetworkManager,它们就被分配为默认区域。
安装时,firewalld 里的默认区域被设定为公共区>域。
看所有的zone:firewall-cmd –get-zones
看默认的zone:firewall-cmd –get-default-zone
设默认的zone:firewall-cmd –set-default-zone=xxxx
看某网卡的zone:firewall-cmd –get-zone-of-interface=enoxxxxx
设某网卡的zone:firewall-cmd –zone=public -add-interface=enoxxxxxx
改某网卡的zone:firewall-cmd –zone=dmz –change-interface=enoxxxxx
删某网卡的zone:firewall-cmd –zone=dmz –remove-interface=io
看所有网卡的zone:firewall-cmd –get-active-zones
看所有的service:firewall-cmd –get-services
看当前zone下的:firewall-cmd –list-services
看某个zone下的:firewall-cmd –zone=public –list-services
临时添加service:firewall-cmd –zone=public –add-service=http
文件中加service:firewall-cmd –zone=public –add-service=http –permanent
删文件中service:firewall-cmd –zone=public –remove-service=http –permanent
—————————————————————————————————-
举例一:自定义ssh端口为1222,添加新端口
全局:firewall-cmd –add-port=1222/tcp –permanent
针对某个zone:firewall-cmd –zone=home –add-port=443/tcp –permanent
(此时就会生成或更新一个work.xml配置文件)
举例二:启动端口转发,将22端口转发到127.0.0.2
firewall-cmd –zone=home -add-forward-port=22:proto=tcp:toaddr=127.0.0.2
举例三:修改ftp端口,由默认的21改为1221
cp /etc/firewalld/services/ftp.xml /etc/firewalld/services/
vim /etc/firewalld/services/ftp.xml //把21改为1221
vim /etc/firewalld/zones/work.xml //work为默认的zone,编辑增加<service name=”ftp”/>
firewall-cmd –reload //重新加载
- •VMware Workstation Pro 16安装CentOS7超详细图文步骤
- •CentOS7下配置使用JumpServer 堡垒机 (图文教程)
- •CentOS安装jdk的几种方法及配置环境变量方式
- •CentOS忘记密码修改方案以及centos卡在开机登录界面,命令失效的解决方法
- •解决笔记本安装centos7后无法调节屏幕亮度
- •VMware安装CentOS 8.1(CentOS 8系列可参考)的图文详细教程
- •CentOS7下搭建JumpServer
- •CentOS7 minimal 最小化安装网络设置过程
- •CentOS安装rpm包出现冲突时的解决办法
- •Vmware下CentOS7最小化安装方式


